This is an Easter tradition the kids can help with. These rolls are made with a large marshmallow rolled inside refrigerated roll dough, but after they are cooked, the marshmallow melts away, leaving the roll empty inside, just like the tomb. We made them Easter morning last year, and plan on doing it again this year. My kids loved them. Here is the link to the recipe: Easter Morning Rolls
In keeping with the throw pillow cover theme, I thought I'd share my version. I finished these a few months ago, but forgot to take step by step pictures. When I'm crafting, I usually just try to blaze through it while I have the time, so I forget to do before and afters. Besides, I feel like my best creativity comes from looking at something someone else has done, then tweaking it a bit to make it my own. ( Is that still considered copying?) As was the case with these pillows, it was based on a basic tutorial, then I just kind of did trial and error until it looked decent.
Anyway, as you can see, our living room is BLAH! Brown, tan, beige, and blah. It definitely needed some color! When we moved to NC, I tossed all of our throw pillows. They were looking super nasty. You know how it goes, your kids (and perhaps even your spouse) drools or spills stuff all over them. After a while, they just aren't decorative anymore. I drove an hour and a half to the nearest JoAnn's (which is an old, tiny, junky one) to get some pillow forms. I was shocked at how expensive they were!!! So I scratched that plan and headed over to Marshall's. Again, I was surprised at how pricey the pillows were. $20 each? I wasn't about to spend $80 on pillows I'd have to chuck in a year. I wandered back to the clearance section and found four unmatching beauties. What made them beauties? They were only $5 each and they had zippered covers! That meant I could take the covers off and make my own to put on them!!! And $5 for the nice, fluffy, sturdy feather pillows is a steal!
So I brought them home and there they sat on the couches...for months. I wasn't sure what color scheme I wanted to go with. We're renting our house, so we can't paint the walls.
Here are the original covers:
Finally, I decided on a color (and got some motivation) and got to it. I found the blue/white print fabric at Hobby Lobby on clearance before I left Buffalo. Sadly, our nearest HobLob here is 3 hours away. I wish I had bought more of it, but even on clearance, it was still not super cheap.
I knew I wanted removable covers so that I could wash them, but I have very basic sewing skills. Zippers were out of the question. So the basic pillow cover is from this tutorial. On the solid blue ones, I decided to do a ruffle in the center. I got my inspiration from this tutorial, but here's where the tweaking came in. The fabric I used is a little stiffer than normal cotton, so I thought the ruffle should be a little more structured. The fabric's not really "fluffy". I eyeballed the width of each ruffle, making one smaller than the other. The length was about twice as long as the pillow. I hemmed the edges, laid them out on the pillow top and started creating the larger ruffle. I made the folds until they looked pretty even, then pinned it to the center of the pillow. I did the same with the smaller, top ruffle, but made the ruffle folds facing the opposite direction. Have I lost you? This is probably where some good "action" shots would come in, but alas, there's none. Once everything was pinned in place, I just sewed right down the center of the stacked ruffles, onto the pillow top. Then I just sewed the back pieces to the front and stuffed the pillow inside.
It's such a good thing to have removable covers because of this girl:
Last weekend, after eating a hot dog, I told Ruby to wipe the ketchup off of her face. She immediately ran from the kitchen to the living room and buried her face in the white and blue pillow. Ketchup. I just took the cover off, sprayed some stain remover on it, and threw it in the washer on the delicate cycle. Good as new!
First, buy some pillow forms. I got mine at IKEA for $3 each. These measurements are for a 20in.x20in. pillow.
Cut out a patterned fabric piece 18inches x 48inches.
Fold over the short ends about 1/2in. and iron down.
Fold over again the same amount and iron.
Sew down the folded edges.
Center your fabric right side up, and fold over each side toward the middle, overlapping until you have an 18in. x 18in. square. You want it to be 2 inches LESS than the measurement of your pillow, so the cover won't be baggy.
Pin the raw edges together.
Sew the two sides with a 1/4in. seam allowance.
Turn the fabric right side out.
Push corners out so they are nice and pointy.
Stuff the pillow form in, and you're finished!
Now for coordinating appliqued pillows...
Cut some solid material to 18in. x 48in.
Cut out a picture/design form your left over patterned material and a piece of heat-n-bond iron on adhesive and iron it on the back.
Cut closely around the shape.
Peel off the backing and iron onto your solid material, making sure it will end up where you want it once the pillow is sewn.
Add as many cut outs as you like, then sew around your design with a small zig-zag stitch.
Sew the pillow together just like the first one.
Now the couches aren't boring, and when the kids slime up the pillows, you can easily remove the covers and throw them in the wash!
One time, I got bleach on my favorite comfy tank. But I, being the cheap person that I am, refused to just throw it away..
so it sat in a pile, waiting to be fixed for about a year.
Until one day, I came up with a simple solution!
I unbuttoned it
And pinned a scrap of eyelet lace to the inside
sewed it on, folded in and sewed the raw edges of lace...
and it covered up the big spot perfectly! There is still a tiny little pink spot, but it doesn't really bother me as much. I was lucky that the stain was in a convenient place, otherwise I would have had to be a bit more creative with my "embellishing".
In trying to get everything ready before this baby arrives, I realized we did not bring our Easter baskets across the country with us. I found this cute tutorial and whipped up these little beauties for my boys. I doubled the pattern size because the tutorial seemed too small. Mine ended up HUGE, so now instead of baskets the boys will get duffel bags. Next time I will just follow the tutorial!
Everything in the floral section of Hobby Lobby was 50% off, so I decided to make this little spray for my wall. I spent a total of about $8 to make it.
I started with these:
I layed the long stems opposite, like this:
trimmed them to the length I wanted with wire cutters,
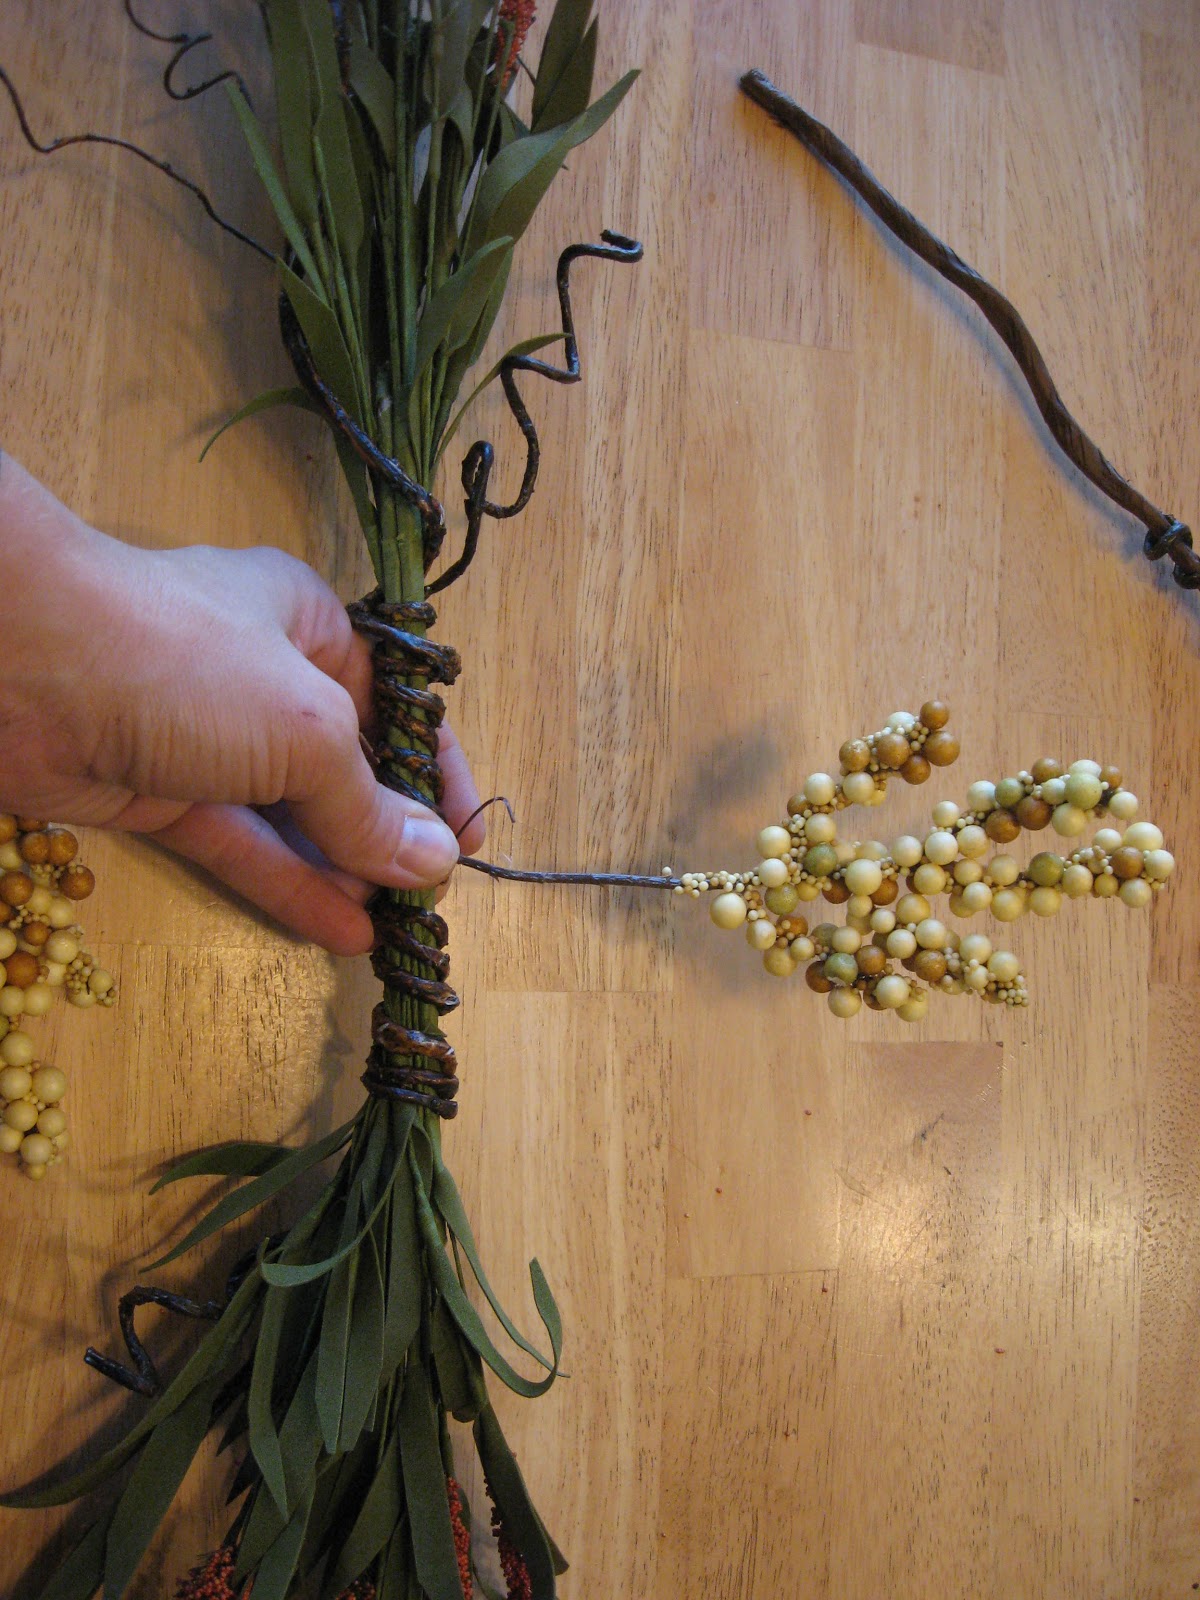
then I cut some of the wired branches off the other piece...
and used it to wrap the two stems together, then added more of the curly branches. The beauty of working with wire is that you can bend it to look however you want.
Then I cut off some of these ball-bunches, and just wrapped
them around with their wired stems until I had this:
I found these paper mache stars at Hob Lob (50cents for the smaller ones, $1 for the bigger one).
I painted them brown.
Then I lightly brushed them with some metallic paint, so they would look like metal.
I hot glued them to the center of the arrangement.


 So I brought them home and there they sat on the couches...for months. I wasn't sure what color scheme I wanted to go with. We're renting our house, so we can't paint the walls.

 Last weekend, after eating a hot dog, I told Ruby to wipe the ketchup off of her face. She immediately ran from the kitchen to the living room and buried her face in the white and blue pillow. Ketchup. I just took the cover off, sprayed some stain remover on it, and threw it in the washer on the delicate cycle. Good as new!
 First, buy some pillow forms. I got mine at IKEA for $3 each. These measurements are for a 20in.x20in. pillow.


 In trying to get everything ready before this baby arrives, I realized we did not bring our Easter baskets across the country with us. I found this cute tutorial and whipped up these little beauties for my boys. I doubled the pattern size because the tutorial seemed too small. Mine ended up HUGE, so now instead of baskets the boys will get duffel bags. Next time I will just follow the tutorial!
 Everything in the floral section of Hobby Lobby was 50% off, so I decided to make this little spray for my wall. I spent a total of about $8 to make it.


 Then I cut off some of these ball-bunches, and just wrapped