January 3, 2013

Headboard

He's so annoyed with me!
This isn't really a tutorial- as I didn't document the process.  I DO hope it inspires you to tackle that headboard project that you have pinned, but are to scared to try.  Making a headboard can be easy and REALLY fun!  I decided to make a headboard over Christmas break...and it actually worked.  The best part is that I only spent $25.  So cool.


 The artist Kiki Smith was my inspiration:


I bought cheap muslin, batting, fabric dye, and embroidery thread.  First, I did a series of dip dying in different colors of rit dye.  My hands were stained and looked a little troll-ish because I didn't wear gloves.  I intended the fabric to be a quite a bit darker- like a deep black/purple, but I am pleasantly surprised with the lighter color. 

 I used my mom's gigantic embroidery hoop to stitch the stars (I did this while watching Anne of Green Gables with my sisters and mom- this is highly recommended).  I loved stitching the stars free-hand, it was exciting and interesting to see how each one developed.

Then I slapped the batting and fabric to a big piece of wood and stapled it to the back (with a staple gun- duh).  That is it.  Simple.  It is not a fancy headboard, but it is perfect for me!

Now, go make a headboard and send us a link so we can see it!

December 22, 2012

Cute Christmas Cookies (recipes and tutorial)

     
 I spent a day in my pajamas making these Christmas cookies, and I love how they turned out!  A while back, I tried making flow icing cookies and they looked o.k., but tasted not so great.  I used a different recipe this time , and they were delicious!  The flow icing technique is time consuming, but really fun!

 First, make the cookies using this recipe: http://www.kitchengifts.com/nofailsugarcookies.html

You don't need to refrigerate the dough for hours like it says, because you can use this cool trick...
 Roll out a circle of dough 1/4 in. thick between two sheets of wax paper and refrigerate for about 10-15 min.  Cut out cookies and bake.  I kept rotating new discs of dough to and from the fridge, and it went swimmingly.  This recipe is great because the cookies turn out smooth and flat for decorating.
Now the fun part!  I modified a recipe I found online to work a little better than the original.  Here it is...
Royal Icing

4 TBSP meringue powder
1 cup water (not quite filled to the top)
1 lb. powdered sugar
2 tsp. light corn syrup
1 tsp. vanilla extract

Combine meringue powder and water.  Sift in powdered sugar and mix until combined.  Add extract and corn syrup and mix on high for about 5 min.  It is ready when a stiff peak forms when lifting the beater out of the icing.  Color with gel food coloring if desired.  Put in squeeze bottle or pastry bag and use for outlining cookies.  The outline acts as a dam for the thinner icing you will use to "flood" the cookie. For filling in or flooding cookies, thin the icing with water a TBSP. at a time until it's the consistency of syrup.  A good test is to drizzle some from a spoon into the bowl of icing and it should  disappear in about 3 seconds.  Flood cookies and use a toothpick to help spread the icing. 

You can add decoration with another color of thinned flood icing.  If you decorate while the base color is still wet, you will get a smooth, flat finish like these.  If you prefer raised pattern, wait a few hours for the base to dry, then apply the details with the second color.  


Let the iced cookies dry overnight, or for several hours.  Once dry, they can be stacked without messing up the design.  This makes them easy to transport to parties, etc.  

Now EAT one or some because they are sooooooooooooooooooo yummy!

December 11, 2012

Shopping Tip

Just thought I'd share this fun little shopping tip I saw on a friend's blog since I can totally picture all of us doing this.  She says:

JCP's Christmas Buttons. Here's what you do: Go to every JCP cash register possible and ask for Christmas buttons. It's basically as awesome as trick-or-treating because at each register they give you 2 to a handful of adorable Christmas pins with a code on the back where you go online to enter for a chance win gift cards and other prizes. You can enter 2 per person a day and it's kind of fun and addicting because we've already won $70 dollars in gift cards in just two days!

I will say that I tried this and found that people here in California are far more stingy--no handfuls for me. But so far I've got $15 so it's worth a shot (plus now I have a bunch of cute pins that I don't know what to do with)! Also try to go at a time that's not very busy, because it's pretty awkward to stand in a line of people making actual purchases just to ask for some free buttons. Let me know how it goes!

December 4, 2012

Easiest Skirt EVER

One time I found this awkward-fitting, stretchy dress at a thrift store.


Then I chopped off the top 4 inches and had a new skirt.


Then I remembered that tight, horizontal stripes are not for the pear-shaped (hence the long sweater). But for those of you narrow-hipped ladies who probably have not yet given birth, go for it! 

P.s. If you don't happen to have a stretchy dress lying around, you could easily make this by tracing a pencil skirt you already have onto 2 layers of stretchy fabric and sewing up the sides. 

November 11, 2012

Thank You Card Printable

Happy November!! To me, Thanksgiving means giving a lot of thank you cards.  Here is one I made recently:


It's a mini card (about 2.5 inches across and 3.5 inches tall)  the perfect size for attaching to a treat.  Copy and paste it into word (you can fit four to a page), and print on card-stock. 

November 7, 2012

Tea Staining: From White to Ivory

Before
 I have been on the hunt for little boys ivory colored dress shirts for a while now.  I usually dash down to the neighborhood Burlington and have no problem finding a rainbow of dress shirts in little boys sizes. After a couple trips and some digging I did find Landon (sz 4) an ivory dress shirt.  As for Crew, I can not find a size 18M ivory dress shirt ANYWHERE! I even forced Sam to look in every store at AZ Mills with me and had no luck. There are quite a few options online, if you can stomach spending $20 on a shirt for toddlers...
So being the cheap soul that I am, I took a tip from Mrs. Forrester ( I hope you've all seen Cranford) and decided to "improve the color" on my own.

Here's what you need:

Fabric to be dyed
Lipton Tea (amount depends on the depth of color you are trying to achieve)
Stock Pot
Wooden spoon
Water
Vinegar

Directions

1. Fill a large stock pot with 20 cups of water.
2. Place the fabric to be stained in a large pot and fill with water, making sure the fabric is completely covered with a bit to spare. If needed add more water.
3. Remove the fabric and squeeze as much of the water out as possible (back into the pot.) Set fabric aside.
4.Bring the water to a boil, then turn off heat.
5. For 20 cups I used 4 teabags. A very "safe" ratio is 1 tea bag to 5 cups water. If you want a darker ivory or tan color use more tea. Add the tea bags to the hot water and allow to steep for about 3 minutes.

6. Remove the tea bags.
7. IMPORTANT! Let the tea sit until warm or you will burn your hands wringing out the fabric!
8. Place the fabric to be stained into the tea. Stir around to make sure the tea gets into all the folds and pockets of the fabric.

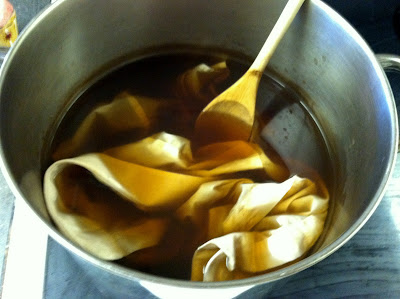
9. Allow to sit for a minimum of five minutes. The longer it remains in the tea, the darker the stain will be. Check periodically on the color, keeping in mind that it will lighten as it dries.
10. Wring out the fabric well, then rinse in cold water to remove excess acids from the tea.
11. Rinse well with vinegar, to set the dye in the fabric. The vinegar can be used straight, or diluted up to one part in ten in water for larger pieces where using so much straight vinegar would be cost prohibitive.

12. Use a dryer to dry the fabric.
13. Wash thoroughly as normal, to remove any remaining tea and vinegar.

I promise there is a difference, it just isn't drastic. You can play around with your recipe/sitting time to achieve whatever hue you want!
After
And there you have it. I've read that as long as you set the fabric with vinegar you can wash as normal and it shouldn't fade. Just to be safe, don't wash it with other whites the first few times you wash it.

November 2, 2012

Rescued Skirt and Necklace

Before you throw something away that appears unusable, think outside the box, and you may be able to prolong the life of whatever you were going to get rid of. 
 Example #1 is a dress with a high waist that had gotten too short for my daughter (rather, she had gotten too tall).  She loved it and was sad to think of giving it away, so she became resourceful and cut off the top of the dress above the elastic waist, folded the raw edge under, and with no sewing, it became a skirt that is plenty long for her!  I'm proud of her for the genius idea and grateful that she's saving me money by wearing it longer!
 Example #2 is a necklace who's beads were chipping and peeling and therefore looking very shoddy.  I was ready to toss it when I had an idea: paint over the chipped areas with matching nail polish!  It's good as new now, and I don't have to run out and buy another red necklace.